Let's Encrypt my personal site and my blog
11 December 2016
## Introduction
For the past few months, I have followed the rise of Let’s Encrypt but I could not find the time to add it to my website. Big mistake !!!! Yesterday, I finally did it and it took me just under 10 minutes to have it up and running. I must say that I was impressed with the tools provided by this service.
So without further ado, let’s describe the steps I took to do it.
My server is running debian jessie with apache 2.4 and I followed the tutorial to install certbot with its apache module. As I already had the jessie backport repository installed, I just had to run this command :
$ sudo apt-get install certbot python-certbot-apache -t jessie-backports
And certbot was installed. After this, if you are lucky, you are just one more command from having HTTPS on your website.
I decided to use the apache module because I was quite curious to see how it enabled SSL automatically on an existing configuration. I will describe what went well and what went wrong. But finally, I removed this let’s encrypt installation and I installed it again using the certonly feature and I configured my hosts manually. But it is interesting to see what happen when we use the automatic feature.
## Apache module automatic
You have some details on what the automatic apache module is doing here.
- make temporary config changes to your apache configuration (adding a new vhost to pass an ACME Challenge, and enabling mod_ssl if necessary)
- performs a graceful reload
- reverts all changes
- performs another graceful reload
- Edit your non SSL vhost to force redirect to https (if you have activated this feature when you ran the command)
- Add SSL vhost
- performs another graceful reload
The command to run is :
$ sudo su
$ certbot --apache
The program will ask you some questions.
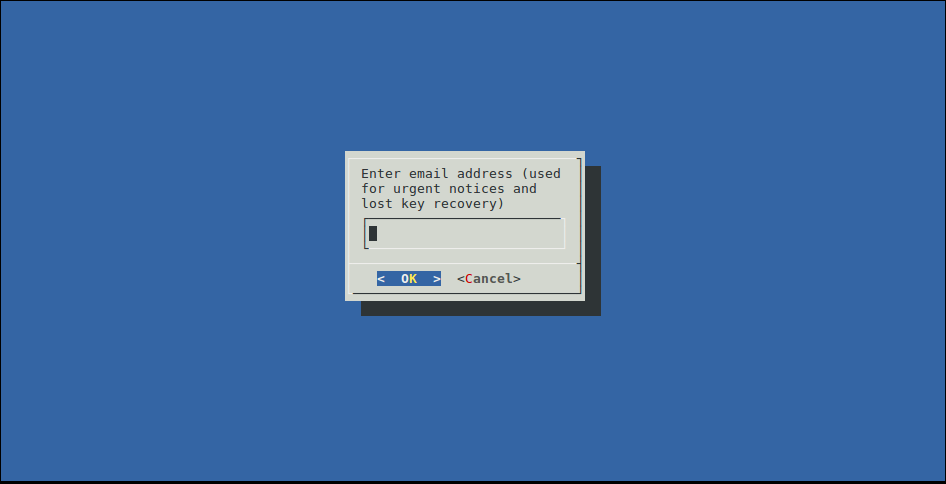
First, you have to fill in your email. It will automatically create an account at Let’s encrypt in order for you to recover the keys if needed.
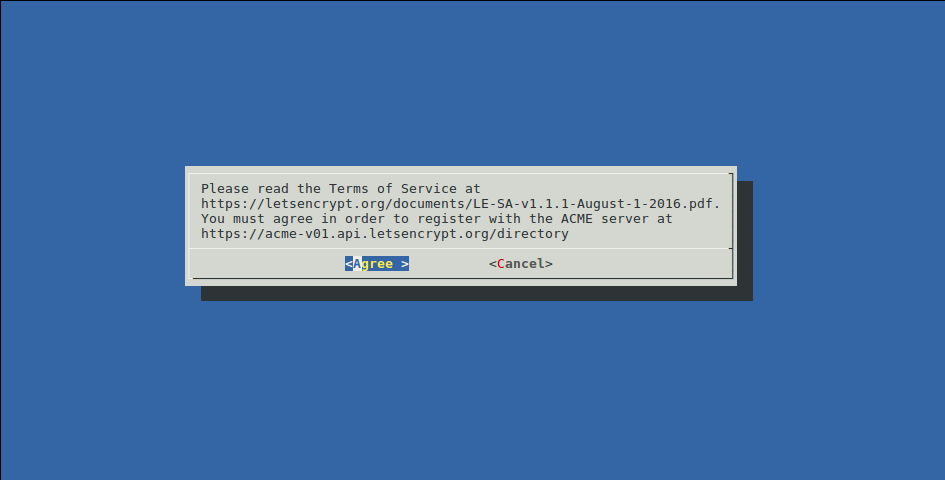
Then, you agree to the Terms & Conditions
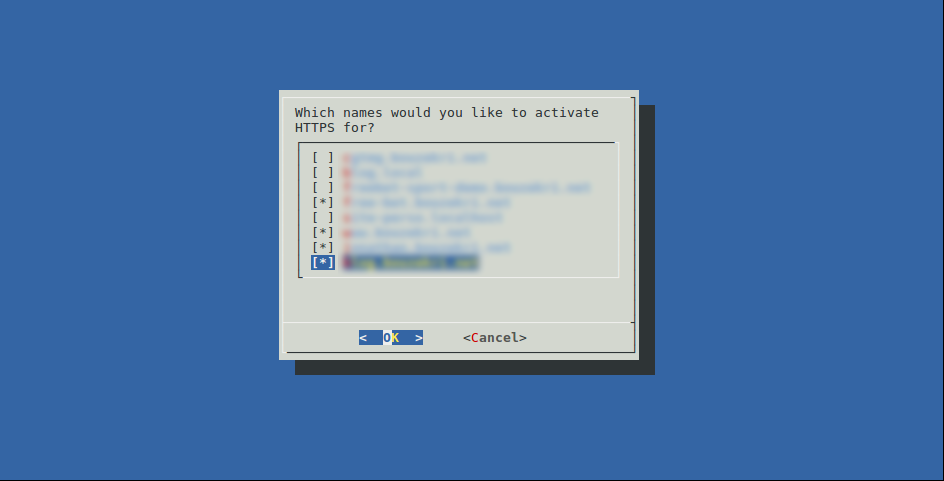
Then, it will read your vhost files and look for the ServerName and ServerAlias directives and prompt you to choose the vhost you want to enable SSL on.
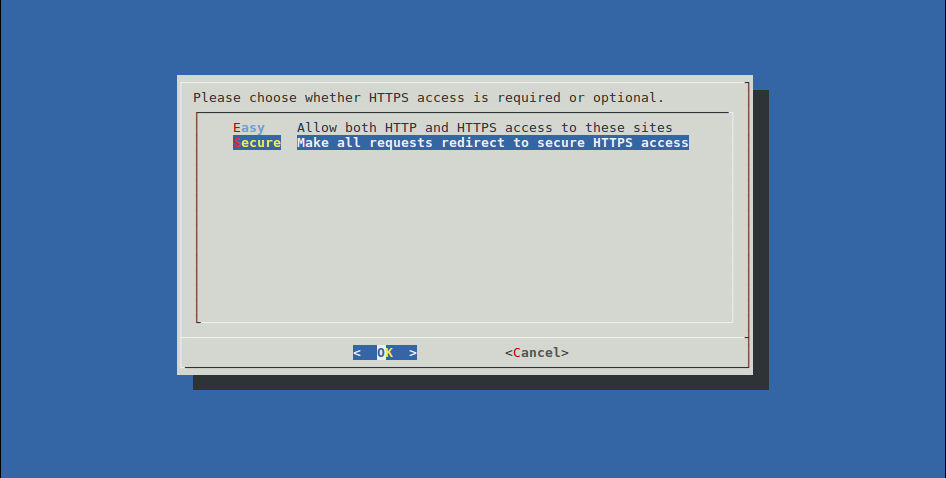
And finally, you have to choose if you want to force redirect from http to https on these hosts.
After that, certbot will apply the steps I described above and you get back your prompt with this message in case of a success :
IMPORTANT NOTES:
 - Congratulations! Your certificate and chain have been saved at
   /etc/letsencrypt/live/<hostname>/fullchain.pem. Your cert will
   expire on 2017-03-10. To obtain a new or tweaked version of this
   certificate in the future, simply run certbot again. To
   non-interactively renew *all* of your certificates, run "certbot
   renew"
 - If you lose your account credentials, you can recover through
   e-mails sent to <your email>.
 - Your account credentials have been saved in your Certbot
   configuration directory at /etc/letsencrypt. You should make a
   secure backup of this folder now. This configuration directory will
   also contain certificates and private keys obtained by Certbot so
   making regular backups of this folder is ideal.
 - If you like Certbot, please consider supporting our work by:

   Donating to ISRG / Let's Encrypt:   https://letsencrypt.org/donate
   Donating to EFF:                    https://eff.org/donate-le
But what is interesting are the changes it made to my apache configuration.
For each vhost I have selected, it :
-
Has duplicated the vhost configuration in another file with the SSL configuration. So for a file
myvhost.confyou have a new filemyvhost-le-ssl.conf -
On this new file, it has enabled
SSLEngine, configured the path to the certificate and its key and imported a default SSL configuration :
<IfModule mod_ssl.c>
<VirtualHost *:443>
Copy of your previous vhost configuration

SSLCertificateFile /etc/letsencrypt/live/<your hostname>/fullchain.pem
SSLCertificateKeyFile /etc/letsencrypt/live/<your hostname>/privkey.pem
Include /etc/letsencrypt/options-ssl-apache.conf
</VirtualHost>
</IfModule>
- On the standard vhost, it has inserted before the closing
</VirtualHost>these lines :
RewriteEngine On
RewriteCond %{SERVER_NAME} =myvhost [OR]
RewriteCond %{SERVER_NAME} =its_first_alias [OR]
RewriteCond %{SERVER_NAME} =its_second_alias
RewriteRule ^ https://%{SERVER_NAME}%{REQUEST_URI} [END,QSA,R=permanent]
Note : the RewriteEngine line is only inserted if you have not enabled it already
I must say that this solution and implementation is impressive and it should work for most simple installations but in my case I had some issues.
- The rewrite rules to redirect are put at the end of the file, if you already have some rewrite rule before, they could be priorized and the redirect never happen (this is what happened in my case)
- It seems that the CN used in the certificate is the first vhost it found (I would have like another vhost as the CN)
## Apache module certonly
So I removed my newly created /etc/letsencrypt folder and recreate it using the certonly method this time :
$ certbot --apache certonly -d main_vhost_you_want_as_CN -d additional_SAN_1 -d additional_SAN_2
You can add almost as much SAN you want by passing new -d parameters.
This command creates the /etc/letsencrypt and execute steps 1 to 4 in the list mentioned in the previous chapter
Then I updated my apache configuration manually. Instead of splitting http and https in 2 different vhost files, I added at the top of each :
<VirtualHost *:80>
    ServerAdmin <my email>

    ServerName <my vhost>
    ServerAlias <first alias>
    ServerAlias <first alias>

    RewriteEngine On
    RewriteRule ^ https://<my vhost>%{REQUEST_URI} [END,QSA,R=permanent]
</VirtualHost>
Then for the existing configuration, I switched <VirtualHost *:80> to <VirtualHost *:443> and inserted these lines just after the ServerName and ServerAlias directives :
SSLEngine on
SSLCertificateFile /etc/letsencrypt/live/<my vhost>/fullchain.pem
SSLCertificateKeyFile /etc/letsencrypt/live/<my vhost>/privkey.pem
Include /etc/letsencrypt/options-ssl-apache.conf
An apache graceful reload later, and I had my websites under HTTPS.
Don’t forget
This is important so don’t forget :
- Backup the
/etc/letsencryptfolder. For me, I have a provisioning script made using Ansible for my server. So I have added the deployment of this folder to this script and created a small script to update this backup after each certificate renewal. - Renew your certificates. Add a cron job to renew your certificate. For example, in the
rootcrontab, you can run this command once a monthcertbot renew